Decoupled Users (Bring Your Own Users)
Bring your own authentication system. Roled manages only roles and permissions through service-to-service API calls. Perfect for applications with existing user databases or custom authentication.
What you’ll build
| Step | Outcome |
|---|---|
| 1 | Obtain client credentials for machine-to-machine auth |
| 2 | Get a service access token for API calls |
| 3 | Register users in Roled using your internal user ID |
| 4 | Query user roles and permissions on each request |
| 5 | Enforce permissions using your cached or real-time data |
| 6 | Implement secure logout with token revocation |
Prerequisites
- A Roled Console account with a project created (see Project Setup)
- A backend service with existing authentication system
curlfor API verification (optional)
1. Obtain client credentials
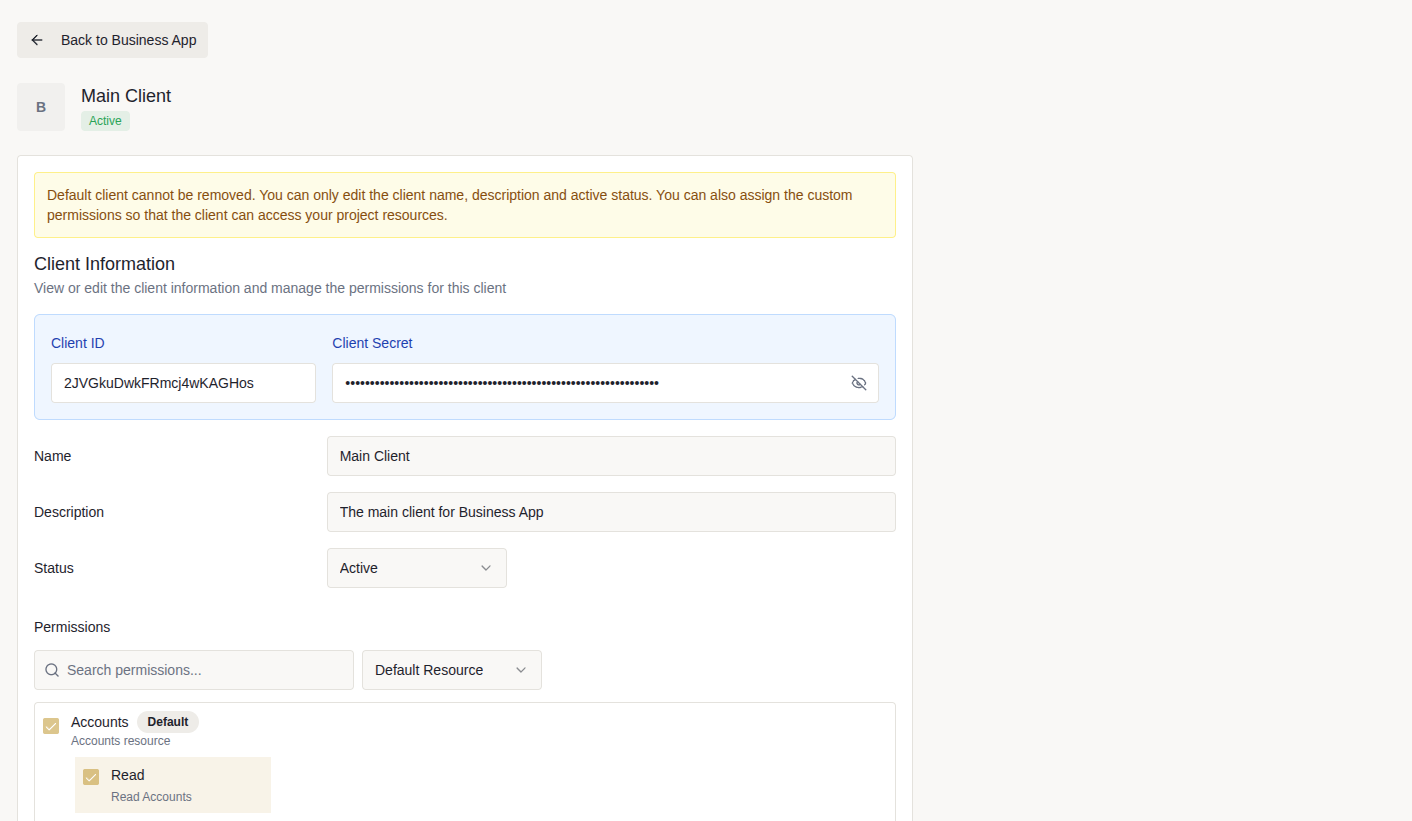
For decoupled users, you can use the default client that was automatically created when you set up your project or create a new client for more granular permissions. For this guide, we’ll use the default client.
Open your Business App project in Roled Console.
Navigate to the Clients section.
Locate the default client (e.g., Main Client).
Click on the client’s name to open Client Details page.
Copy both Client ID and Client Secret—you’ll need these for service authentication.
2. Obtain service access token
Your backend service authenticates with Roled using the Client Credentials flow—a standard OAuth 2.0 pattern for machine-to-machine authentication. This flow exchanges your client credentials for a short-lived access token.
const CLIENT_ID = '2JVGkuDwkFRmcj4wKAGHos'; // from Client Details page
const CLIENT_SECRET = 'pJmE9rzbUwvCPBXgtTrGao8Tigv6hX643W6rz7w...'; // from Client Details page
const TOKEN_URL = 'https://auth.roled.io/api/v1/tokens';

function base64Encode(credentials) {
  return Buffer.from(credentials).toString('base64');
}

async function getServiceAccessToken() {
  const credentials = `${CLIENT_ID}:${CLIENT_SECRET}`;
  const authHeader = `Basic ${base64Encode(credentials)}`;

  const body = new URLSearchParams({
    grant_type: 'client_credentials',
  });

  const response = await fetch(TOKEN_URL, {
    method: 'POST',
    headers: {
      'Content-Type': 'application/x-www-form-urlencoded',
      Authorization: authHeader,
    },
    body: body.toString(),
  });

  const result = await response.json();

  if (!result.success) {
    throw new Error(`Token request failed: ${result.error?.message}`);
  }

  return result.data.access_token;
}
Use the Inspect Current Access Token endpoint to retrieve token details including your project ID, client information, and granted permissions. This endpoint is essential for obtaining the project ID needed in subsequent API calls.
async function getTokenDetails() {
  const accessToken = await getServiceAccessToken();

  const response = await fetch('https://auth.roled.io/api/v1/tokens/current', {
    headers: {
      Authorization: `Bearer ${accessToken}`,
    },
  });

  const result = await response.json();

  if (!result.success) {
    throw new Error('Failed to inspect token');
  }

  // result.data contains: project, client, permissions, issued_at, expires_at
  return result.data;
}

// Extract specific information from token details
async function getProjectId() {
  const tokenDetails = await getTokenDetails();
  return tokenDetails.project.id;
}Handle token expiration automatically
Service access tokens expire after 1 hour. When your API call receives a 401 Unauthorized error, simply request a new token with the same client credentials. Here’s a caching implementation with automatic refresh:
// Token cache with expiration tracking
const tokenCache = {
  accessToken: null,
  tokenDetails: null, // stores full response from /api/v1/tokens/current
  expiresAt: null,
};

async function getValidAccessToken() {
  const now = Date.now();

  // Check if current token is still valid (with 60s buffer)
  if (tokenCache.accessToken && tokenCache.expiresAt && (now < tokenCache.expiresAt - 60000)) {
    return tokenCache.accessToken;
  }

  // Token expired or not present, get a new one
  const newToken = await getServiceAccessToken();

  // Cache the token (typical expiry is 3600 seconds = 1 hour)
  tokenCache.accessToken = newToken;
  tokenCache.expiresAt = now + 3600 * 1000;

  // Clear token details cache when token changes
  tokenCache.tokenDetails = null;

  return newToken;
}

async function getValidTokenDetails() {
  // Return cached token details if available
  if (tokenCache.tokenDetails) {
    return tokenCache.tokenDetails;
  }

  // Fetch fresh token details using getTokenDetails()
  tokenCache.tokenDetails = await getTokenDetails();

  return tokenCache.tokenDetails;
}

async function getValidProjectId() {
  const tokenDetails = await getValidTokenDetails();
  return tokenDetails.project.id;
}

// Example: Get client information from cached token details
async function getClientInfo() {
  const tokenDetails = await getValidTokenDetails();
  return {
    clientId: tokenDetails.client.id,
    clientName: tokenDetails.client.name,
    projectName: tokenDetails.project.name,
    permissions: tokenDetails.permissions,
  };
}401 Unauthorized error occurs, the caching layer automatically requests a new access token using the Client Credentials flow. No refresh token is needed—just re-authenticate with your client credentials.3. Register users in Roled
When users authenticate through your system, register them in Roled to establish their roles and permissions. This links your internal user ID to their Roled identity without storing passwords in Roled.
const ROLED_API_URL = 'https://auth.roled.io/api/v1';

async function ensureUserInRoled(externalUserId, displayName, roleId, avatarUrl = null) {
  const serviceToken = await getValidAccessToken();
  const projectId = await getValidProjectId();

  // 1. Check if user already exists in Roled
  const checkResponse = await fetch(
    `${ROLED_API_URL}/projects/${projectId}/users/external/${externalUserId}`,
    {
      headers: {
        Authorization: `Bearer ${serviceToken}`,
      },
    }
  );

  const checkResult = await checkResponse.json();

  if (checkResult.success && checkResult.data) {
    // User exists, return the data
    return checkResult.data;
  }

  // 2. Create user if not found
  if (checkResult.error?.code === 'user_not_found') {
    const body = {
      external_user_id: externalUserId,
      display_name: displayName,
      role_id: roleId,
    };

    if (avatarUrl) {
      body.avatar_url = avatarUrl;
    }

    const createResponse = await fetch(`${ROLED_API_URL}/projects/${projectId}/users`, {
      method: 'POST',
      headers: {
        Authorization: `Bearer ${serviceToken}`,
        'Content-Type': 'application/json',
      },
      body: JSON.stringify(body),
    });

    const createResult = await createResponse.json();

    if (!createResult.success) {
      throw new Error(`Failed to register user: ${createResult.error?.message}`);
    }

    return createResult.data;
  }

  throw new Error(`Failed to check user status: ${checkResult.error?.message}`);
}

// Usage in your login flow
async function handleLogin(req, res) {
  const { username, password } = req.body;

  // 1. Authenticate with your existing system
  const user = await authenticateUser(username, password);
  if (!user) {
    return res.status(401).json({ error: 'Invalid credentials' });
  }

  // 2. Register or sync user in Roled
  const defaultRoleId = '2JRYtvorEzhNgMLHeqZiNo'; // e.g., "Inventory Staff"
  const roledUser = await ensureUserInRoled(
    user.id, // your internal user ID
    user.display_name,
    defaultRoleId,
    user.avatar_url
  );

  // 3. Create your session
  req.session.userId = user.id;
  req.session.roleId = roledUser.role_id;
  req.session.roleName = roledUser.role_name;

  res.json({
    success: true,
    user: {
      id: user.id,
      display_name: user.display_name,
      role: roledUser.role_name,
    },
  });
}
4. Query user roles and permissions
Since user roles and permissions typically remain stable, it is recommended to implement a caching strategy. This significantly improves your application’s performance by reducing API latency and avoiding redundant network calls on every request.
const permissionCache = new Map();
const CACHE_TTL = 5 * 60 * 1000; // 5 minutes

async function getUserPermissions(externalUserId) {
  const serviceToken = await getValidAccessToken();
  const projectId = await getValidProjectId();

  const response = await fetch(
    `${ROLED_API_URL}/projects/${projectId}/users/external/${externalUserId}?include_permissions=true`,
    {
      headers: {
        Authorization: `Bearer ${serviceToken}`,
      },
    }
  );

  const result = await response.json();

  if (!result.success || !result.data) {
    throw new Error('User not found in Roled');
  }

  const user = result.data;
  return {
    roleId: user.role_id,
    roleName: user.role_name,
    permissions: user.permissions || [],
  };
}

async function getPermissionsWithCache(externalUserId) {
  const cached = permissionCache.get(externalUserId);
  const now = Date.now();

  if (cached && (now - cached.timestamp) < CACHE_TTL) {
    return cached.data;
  }

  const permissions = await getUserPermissions(externalUserId);

  permissionCache.set(externalUserId, {
    data: permissions,
    timestamp: now,
  });

  return permissions;
}
5. Enforce permissions
Once you’ve cached user permissions, enforce them in your application to control access to resources and features. This section demonstrates two common patterns: middleware for route-level protection and direct checks for conditional UI rendering.
Middleware pattern (Express.js)
Create reusable middleware to protect routes based on required permissions. This approach keeps authorization logic centralized and makes it easy to secure multiple endpoints consistently.
function requirePermission(requiredPermission) {
  return async (req, res, next) => {
    try {
      const externalUserId = req.session.userId;
      if (!externalUserId) {
        return res.status(401).json({ error: 'Unauthorized' });
      }

      const { permissions, roleName } = await getPermissionsWithCache(externalUserId);

      if (!permissions.includes(requiredPermission)) {
        return res.status(403).json({
          error: 'Forbidden',
          message: `Permission '${requiredPermission}' required for role '${roleName}'`,
        });
      }

      req.userPermissions = permissions;
      req.userRole = roleName;
      next();
    } catch (error) {
      console.error('Permission check failed:', error);
      return res.status(500).json({ error: 'Authorization failed' });
    }
  };
}

// Example protected endpoints
app.get('/products', requirePermission('products:read'), async (req, res) => {
  const products = await db.getProducts();
  res.json({ products });
});

app.post('/products', requirePermission('products:create'), async (req, res) => {
  const product = await db.createProduct(req.body);
  res.status(201).json({ product });
});

app.delete('/products/:id', requirePermission('products:delete'), async (req, res) => {
  await db.deleteProduct(req.params.id);
  res.json({ success: true });
});
Direct usage in routes
For more complex authorization logic or UI customization, check permissions directly in your route handlers. This gives you fine-grained control over what users can see and do.
app.get('/dashboard', async (req, res) => {
  const externalUserId = req.session.userId;
  const { permissions, roleName } = await getPermissionsWithCache(externalUserId);

  // Customize UI based on user's permissions
  const dashboardData = {
    user: {
      role: roleName,
      permissions: permissions,
    },
    canCreateProducts: permissions.includes('products:create'),
    canViewProducts: permissions.includes('products:read'),
    canUpdateProducts: permissions.includes('products:update'),
    canDeleteProducts: permissions.includes('products:delete'),
    canViewOrders: permissions.includes('orders:read'),
    canUpdateOrders: permissions.includes('orders:update'),
  };

  res.render('dashboard', dashboardData);
});
6. Implement secure logout
When users log out, revoke their tokens immediately to prevent unauthorized access. Token revocation is essential for decoupled users since you control the complete session lifecycle.
Call the Revoke Current Access Token endpoint to invalidate the refresh token immediately:
const REVOKE_URL = 'https://auth.roled.io/api/v1/tokens/current/revoke';

async function logout(externalUserId) {
  // Get the user's session data from your system
  const userSession = await db.getUserSession(externalUserId);
  const refreshToken = userSession.roledRefreshToken;
  const accessToken = userSession.roledAccessToken;
  const clientId = '2JVGkuDwkFRmcj4wKAGHos'; // from Roled Console

  if (refreshToken) {
    try {
      // Revoke the token on Roled server
      await fetch(REVOKE_URL, {
        method: 'POST',
        headers: {
          'Content-Type': 'application/json',
          'Authorization': `Bearer ${accessToken}`,
        },
        body: JSON.stringify({
          client_id: clientId,
          refresh_token: refreshToken,
        }),
      });
    } catch (error) {
      console.error('Token revocation failed:', error);
      // Continue with local cleanup even if server revocation fails
    }
  }

  // Clear user session from your database
  await db.clearUserSession(externalUserId);

  // Clear any cached permissions
  permissionCache.delete(externalUserId);

  return { success: true, message: 'Logged out successfully' };
}

// Express.js logout endpoint
app.post('/auth/logout', async (req, res) => {
  try {
    const externalUserId = req.session.userId;

    if (!externalUserId) {
      return res.status(401).json({ error: 'Not authenticated' });
    }

    await logout(externalUserId);

    // Destroy session
    req.session.destroy((err) => {
      if (err) {
        console.error('Session destruction error:', err);
        return res.status(500).json({ error: 'Logout failed' });
      }

      res.clearCookie('connect.sid');
      res.json({ success: true, message: 'Logged out successfully' });
    });
  } catch (error) {
    console.error('Logout error:', error);
    res.status(500).json({ error: 'Logout failed' });
  }
});Verify with curl (optional)
Use curl to manually test your setup:
Obtain service token and project ID
CREDENTIALS=$(echo -n "YOUR_CLIENT_ID:YOUR_CLIENT_SECRET" | base64)

curl --request POST \
  --url https://auth.roled.io/api/v1/tokens \
  --header "Authorization: Basic $CREDENTIALS" \
  --header 'Content-Type: application/x-www-form-urlencoded' \
  --data-urlencode 'grant_type=client_credentials'
The response includes an access token. Use this token with the Inspect Current Access Token endpoint to retrieve your project ID:
curl --request GET \
  --url https://auth.roled.io/api/v1/tokens/current \
  --header 'Authorization: Bearer <access_token>'
The response includes data.project.id—use this in subsequent API requests.
List users in project
curl --request GET \
  --url https://auth.roled.io/api/v1/projects/<project_id>/users \
  --header 'Authorization: Bearer <access_token>'
Get user by external ID
curl --request GET \
  --url "https://auth.roled.io/api/v1/projects/<project_id>/users/external/<external_user_id>?include_permissions=true" \
  --header 'Authorization: Bearer <access_token>'
Next steps
You’ve successfully integrated decoupled user management! Explore these resources:
- Fully Managed Users: Use Roled’s hosted authentication to speed up your product development. See Fully Managed Users.
- Core Concepts: Users — fully managed vs. decoupled comparison
- API Reference: Users — complete user management endpoints
- OAuth 2.0 — client credentials flow details
- Authorization — advanced permission patterns